

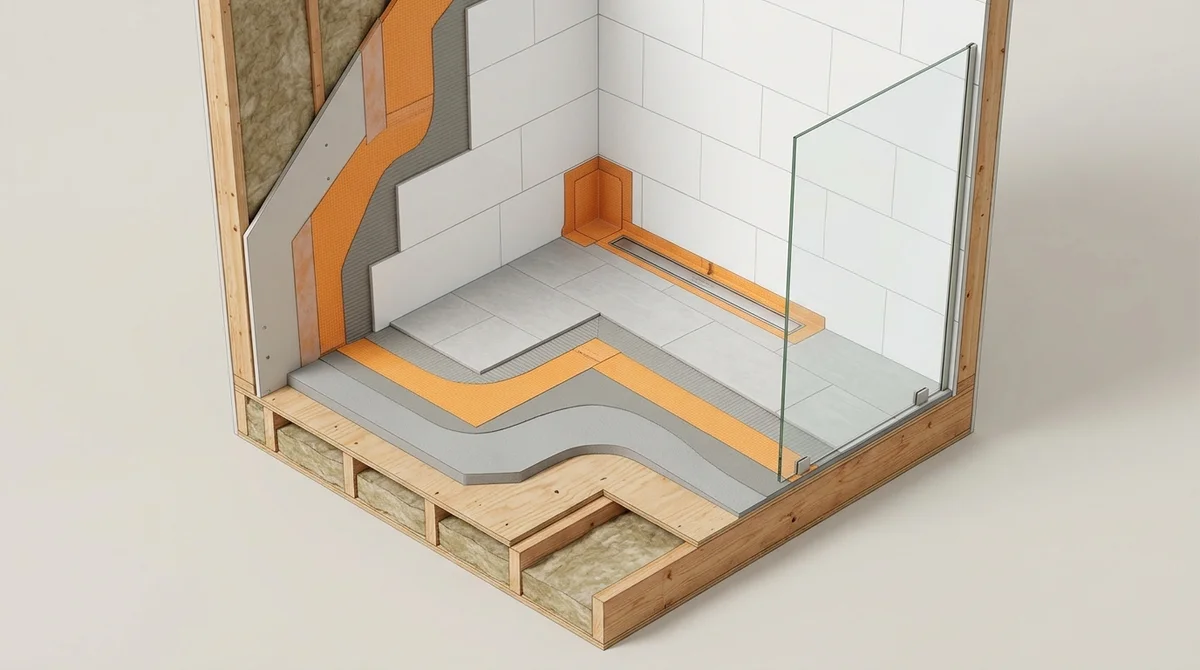
Direct answer. "Waterproofing vs Schluter" is not really a choice between two things. Schluter KERDI is a waterproofing system: a sheet membrane bonded to the walls and floor. The real choice for a walk-in shower is sheet membrane (Schluter KERDI) vs liquid membrane (RedGard, Hydro Ban, AquaDefense), and both work well when they are installed by the book. KERDI wins on consistent thickness and a matched drain; liquid wins on odd shapes, niches and benches. The old mortar bed with a liner is the one to avoid in a modern walk-in.
A walk-in shower has no tub and often no curb, so water reaches every part of the floor and the lower walls on every use. Tile and grout are not waterproof. Grout absorbs water, and whatever sits behind the tile has to stop it. When that layer fails, the leak shows up weeks later as a stain on the ceiling below, loose tiles or a soft subfloor.
This guide explains how each system works, where each one fails, what they cost in Toronto in 2026 and how to choose.
What the code and the tile standards require
- Ontario Building Code. The code requires that shower receptors be built so water cannot leak through the walls or floor. It says very little about how.
- The TCNA Handbook fills the gap. Canadian designers and installers follow the Tile Council of North America (TCNA) Handbook and the TTMAC Specification Guide 09 30 00 for shower assemblies. They call for a waterproof membrane (or a vapour retarder membrane) behind the tile in wet areas.
- Membranes are tested to ANSI A118.10. That is the North American standard for bonded waterproof membranes under tile. Schluter KERDI, RedGard, Hydro Ban and Mapei AquaDefense all meet it.
Sources: Construction Canada, Avoiding waterproofing errors in showers, Schluter, thin-set mortar over KERDI.
The three ways to waterproof a walk-in shower
1. Schluter KERDI sheet membrane system
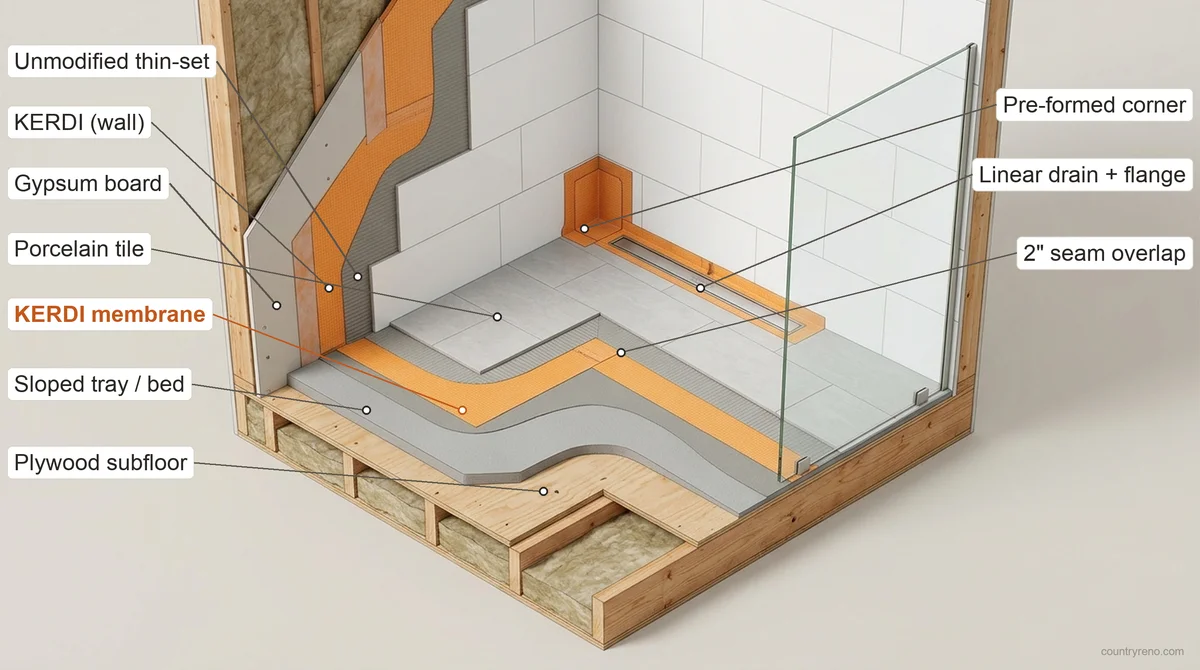
KERDI is a thin polyethylene sheet with a fleece on both sides. It is bedded in thin-set mortar on the walls (over drywall, cement board or KERDI-BOARD) and on a sloped floor (a mortar bed or a pre-sloped foam tray). Seams overlap by 2 inches, corners get pre-formed pieces, and the membrane bonds into a matching KERDI-DRAIN or KERDI-LINE linear drain with a built-in bonding flange.
- Strength: the factory-made sheet has the same thickness everywhere. Nobody can "spray it thin".
- Strength: one manufacturer for the tray, drain, membrane, board and setting mortar, so the parts are designed to work together.
- Watch out: Schluter specifies its own SET mortars or an unmodified thin-set (ANSI A118.1) to set tile on KERDI. Modified thin-set needs to dry out to gain strength, and the membrane stops it drying.
- Watch out: every seam, corner, pipe and valve penetration is a hand-made detail. Skipped overlaps and voids under the sheet are the usual failure points.
2. Liquid-applied membrane
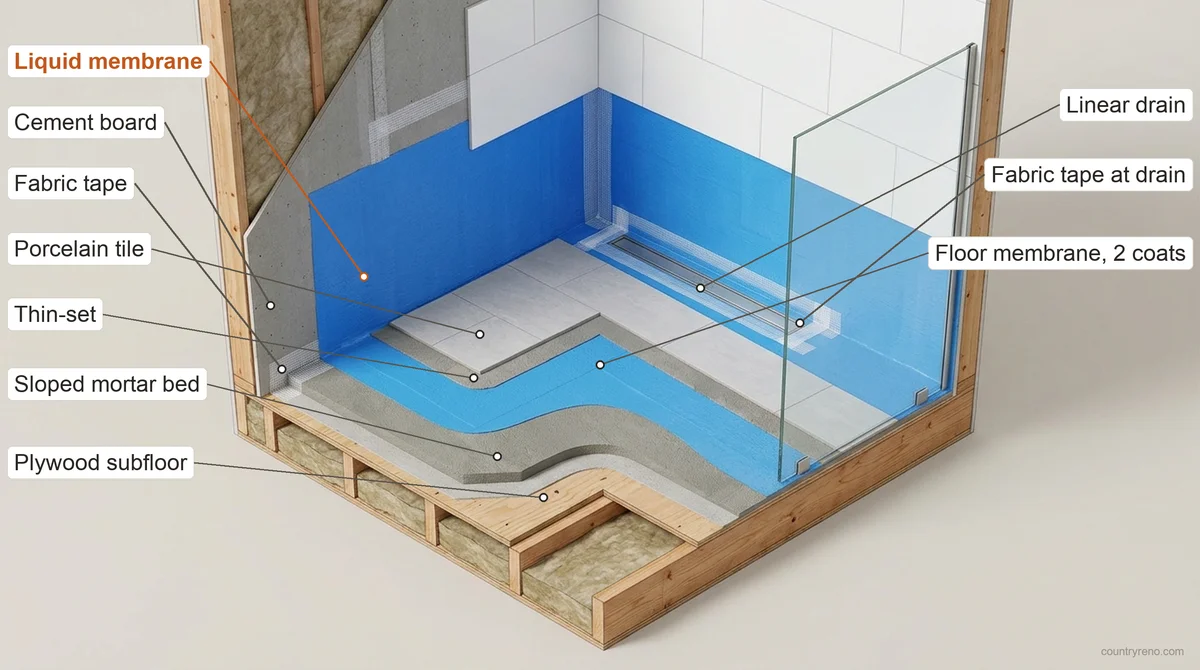
Products such as Custom Building Products RedGard, LATICRETE Hydro Ban and Mapei AquaDefense are rolled or brushed onto cement board and the sloped mortar floor in two coats, with reinforcing fabric at the changes of plane and around the drain. They cure into a seamless rubbery skin.
- Strength: no seams, and it follows niches, benches, curved walls and pipe penetrations easily.
- Strength: regular thin-set (including modified) can be used on most of them; check the product data sheet.
- Watch out: the waterproofing depends on the thickness the installer actually puts on. RedGard, for example, calls for two coats that dry to about 25 to 30 mils (roughly 50 to 60 mils wet). Too thin and it is not waterproof.
- Watch out: cure time. Hydro Ban needs about 24 hours at 10 to 20 °C (50 to 69 °F) before a flood test; cold basements cure slower. Quick-cure versions cut that to hours.
3. Traditional mortar bed with a shower liner
The old method: a sloped pre-bed, a PVC or CPE liner, then a second mortar bed that the tile sits on. Water soaks through the top bed, runs down the liner and out through weep holes in a clamping drain.
- It works when it is built perfectly, but the top mortar bed stays wet, the weep holes clog with thin-set, and the walls still need a separate membrane.
- Curbless and linear-drain walk-ins are hard to build this way.
Schluter KERDI vs liquid membrane: side by side
| What matters in a walk-in shower | Schluter KERDI (sheet) | Liquid membrane (RedGard, Hydro Ban, AquaDefense) |
|---|---|---|
| Thickness | Fixed, factory-made | Depends on the installer; check with a wet-film gauge |
| Seams | 2" overlaps, pre-formed corners | Seamless, fabric at corners and the drain |
| Niches, benches, curves | Possible, slower (pre-formed niches help) | Easiest |
| Drain | Matched KERDI-DRAIN or KERDI-LINE with bonding flange | Any drain with a bonding flange (or clamping drain per the maker) |
| Floor slope | Pre-sloped foam tray or mortar bed | Mortar bed (or compatible tray) |
| Tile setting mortar | Schluter SET mortars or unmodified thin-set | Most thin-sets, per the data sheet |
| Cure before flood test | After the thin-set under the membrane sets (manufacturer timing) | Hours to a day or more, depends on product and temperature |
| Material cost | Higher | Lower |
| Best for | Curbless and linear-drain showers, large tile | Custom shapes, many niches and benches (not steam showers unless rated) |
Walk-in and curbless showers: what changes
- The floor has to drop. A curbless shower needs the subfloor recessed (or the bathroom floor built up) so the shower floor can slope to the drain without a lip at the entry. That is framing work and should be planned before demolition.
- Slope. The standard minimum is 1/4 inch per foot toward the drain. A linear drain lets the floor slope in one direction, which suits large-format tile.
- Waterproof beyond the shower. With no curb, splash and run-off reach the bathroom floor. The membrane should extend past the shower opening, and in many curbless bathrooms it covers the whole floor.
- Wall height. Membrane goes at least to showerhead height. In a walk-in it is worth taking it to the ceiling, and a steam shower needs the ceiling covered too.
- Steam showers are different. They need a vapour-tight assembly (for Schluter, the KERDI-DS membrane) and a sloped ceiling. Standard liquid membranes are not all rated for steam; check the product.
Linear drain vs centre drain
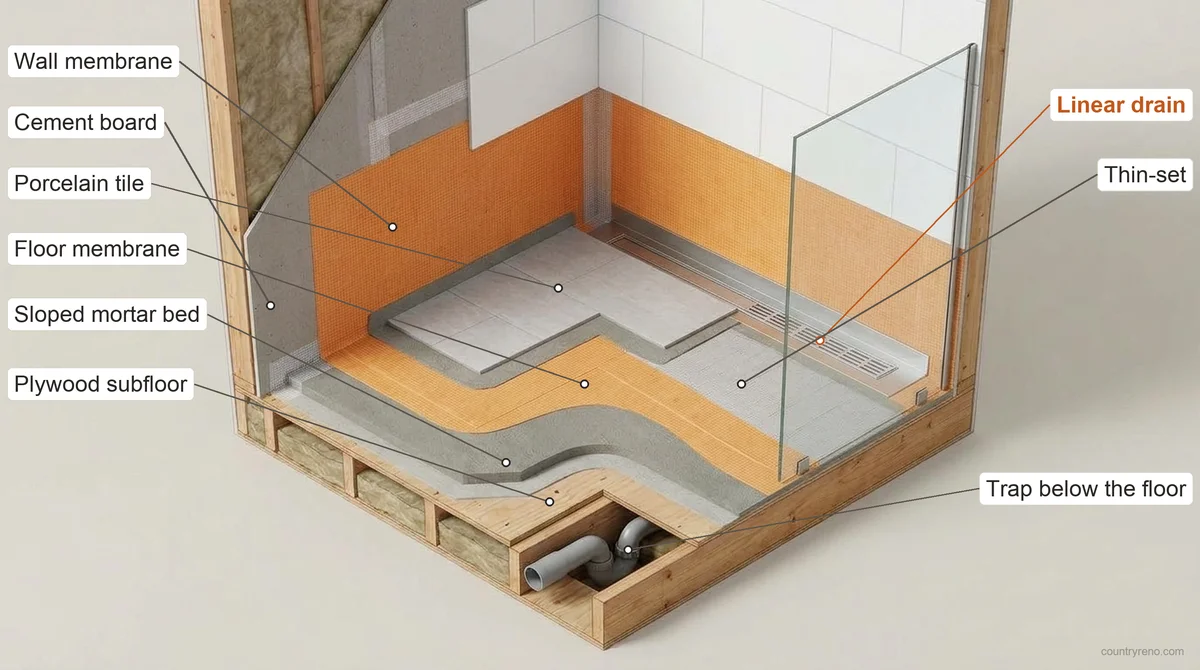
The drain decides how the floor slopes, and the slope decides which tile you can use. Most new walk-in showers use a linear drain.
| What matters | Linear drain | Centre (point) drain |
|---|---|---|
| Floor slope | One direction, a single flat plane | Four ways toward the centre, cut into an "envelope" |
| Tile | Large-format tile works, few cuts | Smaller tile or diagonal cuts at the drain |
| Curbless entry | Easy: the floor falls away from the entry | Harder: water can run toward the entry |
| Where it goes | Along the back wall, a side wall or across the entry | Centre of the shower |
| Waterproofing | Needs a bonding flange along its full length | Bonding flange or clamping ring |
| Grate | Slot grate or a tile-in cover that hides it | Square or round grate |
| Cost | Higher: the drain body costs more and the install is longer | Lower |
- Back wall is the usual spot. The floor slopes away from you, so the entry stays dry and the drain is out of the way.
- Across the entry works for a fully curbless bathroom, but then the shower floor slopes toward the bathroom and the drain has to catch everything.
- Match the drain to the membrane. Schluter KERDI-LINE has the KERDI bonding flange built in. With a liquid membrane, use a linear drain that the membrane maker approves, and embed fabric where the membrane meets the flange.
- Plan it before framing. A linear drain needs room under the floor for the drain body and trap, and joists sometimes have to be headed off.
What it costs in Toronto (2026)
Retail prices give a sense of the material side. A Canadian supplier lists Schluter KERDI-SHOWER kits (tray, membrane and drain parts) at about $575 to $725 for a 38" x 60" shower and about $1,035 for 72" x 72", before tax. A liquid membrane system for the same shower costs a few hundred dollars in material, plus cement board and the mortar bed.
Installed, the waterproofing system typically adds $1,000 to $3,000 to a bathroom renovation, depending on shower size, curbless framing, niches, benches and how much of the floor is membraned. It is a small part of the total (see our bathroom renovation cost guide) and the most expensive part to redo, because fixing it means removing the tile.
Source: Ceramed, Schluter KERDI-SHOWER-KIT prices. Prices change; confirm before you budget.
The mistakes that cause leaks
- No pre-slope under a liner, or a flat spot that holds water.
- Water-resistant board treated as waterproof. Green or purple drywall and cement board resist moisture; they do not stop it. Both still need a membrane.
- Liquid membrane rolled on too thin or the second coat skipped.
- Modified thin-set over KERDI where Schluter calls for unmodified.
- Weak drain connection: membrane not bonded to the drain flange, or weep holes blocked.
- Unsealed penetrations at the valve, shower arm and niche corners.
- No flood test.
Always flood test before tile
Once the membrane has cured, the drain is plugged and the shower floor is filled with water, typically for 24 hours, while someone checks the ceiling or space below. The level should not drop and nothing should show below. It costs a day and is the only way to prove the waterproofing before tile covers it. Ask your contractor whether they flood test, and ask to see it.
Which one should you choose?
- Curbless walk-in with a linear drain and large tile: Schluter KERDI system (or an equivalent full system from one maker).
- Lots of niches, a bench or curved walls: liquid membrane, or KERDI on the flat walls with pre-formed niches.
- Steam shower: a system rated for steam, such as KERDI-DS.
- Any choice: do not mix brands inside one assembly. Manufacturers warrant their own system, installed with their own instructions.
On our bathroom renovations we specify Schluter KERDI or an equivalent full system.
Frequently asked questions
Is Schluter better than RedGard?
Both meet the same ANSI A118.10 waterproofing standard. KERDI gives a guaranteed thickness and a matched drain; RedGard is faster on complex shapes. The installation matters more than the brand.
Do I need waterproofing on the shower walls or only the floor?
Both. Grout lets water through on the walls too. The membrane should cover the walls at least to the showerhead, and in a walk-in usually to the ceiling.
Is cement board waterproof?
No. Cement board does not rot, but water passes through it. It needs a membrane on top.
Can you put RedGard over Schluter KERDI?
It is not recommended. Mixing systems voids the manufacturers' warranties and can trap moisture. Choose one system for the whole shower.
Is a linear drain better for a walk-in shower?
For most walk-ins, yes. It lets the floor slope in one plane, so large tiles fit and a curbless entry stays dry. A centre drain costs less and works well in a smaller shower with a curb.
How long does shower waterproofing last?
A properly installed membrane is meant to last the life of the tile. Shower leaks almost always trace back to installation details such as seams, the drain connection or thin coats, not to the membrane wearing out.
Waterproof once, under the tile
The waterproofing is invisible once the tile is on, and it decides whether your walk-in shower lasts 25 years or starts leaking in two. Pick one complete system, install it to the maker's instructions and flood test it before tiling.
Planning a new shower? See our bathroom renovation page, lay out your bathroom in 3D with the free bathroom vanity designer, or contact us for a free consultation.